Nginx is how you can serve your web app to the world. As a web server, it receives a request for your site, locates and prepares the requested web pages, and sends these pages back to the users’ browsers for their delight.
It’s designed to be able to handle lots of visitors smoothly and quickly and is known for being lightweight and resource-efficient. Some of the biggies which use Nginx include Netflix, Hulu, Pinterest, Airbnb, WordPress.com, GitHub, and SoundCloud. It’s been around for a while, launching in 2004 as a direct competitor to its biggest rival, Apache.
If you have a static site ready to go to test with Nginx then feel free to use your own files. I’ll pop all my code examples here on GitHub for you to borrow.
I used Ubuntu for this project.
Install Nginx and set up firewall
Obviously, first of all, we need to install it!
sudo apt update
sudo apt install nginx
Adjust the firewall with ufw (Uncomplicated Firewall) by allowing HTTP traffic to Nginx:
sudo ufw allow 'Nginx HTTP'Other commands you can use with ufw:
# Check the firewall status
sudo ufw status

# If the status says 'status: inactive'
sudo ufw enable

# If needed, restart or disable the firewall
sudo ufw reload
sudo ufw disable

# List application profiles
sudo ufw list

# Enable a specific port
sudo ufw allow [port number]

# This command will open port 8000 for both TCP and UDP traffic. If you want to specify the protocol, you can do so like this:
sudo ufw allow 8000/tcp

# See more commands
ufw help
Create configs and website files
Now we’ll make a home for our site and create a server block config.
You can have a look at the default server block file:
cat /etc/nginx/sites-available/defaultWe’re going to use our own config and not the default one. It’s a good idea to keep the default config code in our files in case we want to use it as a reference in future, so we’ll just unlink it so it doesn’t get loaded by Nginx:
sudo unlink /etc/nginx/sites-enabled/defaultAdd the folder where our beautiful website is going to be served from:
sudo mkdir /var/www/mywebsiteIf you run into folder permission issues like I did, you can change ownership and permission of the folders to your user name and give yourself read, write, and execute privileges:
sudo chown your_username /var/www/mywebsite
sudo chmod -R 755 /var/www/mywebsite
Set permissions for Nginx:
sudo chown -R www-data:www-data /var/www/mywebsiteTo make sure we’ve got it working, let’s start by making a server block for a localhost-only site - the most useless website in the world.
This is going to be an Nginx configuration file. A server block establishes the settings that determine how the web server will process and respond to HTTP requests targeted at a particular domain or set of domains.
Create a file with nano (use whatever text editor you want):
sudo nano /etc/nginx/sites-available/myconfigYou can of course change ‘mywebsite’ and ‘myconfig’ to whatever names you want.
It’s going to be an HTML site. Add this code and save the file:
server {
    listen 80;
    server_name localhost;

    root /var/www/mywebsite;
    index index.html;

    location / {
        try_files $uri $uri/ =404;
    }
}Listen, server_name, root, index and location are all directives, a set of instructions that tell Nginx how to handle requests and serve content.
Specifically in this server block:
listenSpecifies the port to listen on.server_nameDefines the domain name or names that will be handled by this server block. Here it is justlocalhost.rootDefines the document root or root directory that contains the files to be served. All locations will be relative to this root path.indexSpecifies the default filename to be served if no filename is given in the request URL. Here it isindex.html.locationDefines a location block for the root URL location. This will match all requests not defined elsewhere.try_filesChecks if the requested URI or URI plus/exists as files on disk and serves them if found. If not found, returns a 404 Not Found response.
Create a symbolic link named “myconfig” in the sites-enabled folder. Instead of copying the entire configuration file from sites-available, which can potentially contains many configs, the link just points to it and helps us keep our code nice and organised:
sudo ln -s /etc/nginx/sites-available/myconfig /etc/nginx/sites-enabled/Check that there are no syntax errors in your config:
sudo nginx -tCross your fingers and hope for this result:
nginx: the configuration file /etc/nginx/nginx.conf syntax is ok
nginx: configuration file /etc/nginx/nginx.conf test is successful
Nginx needs to be restarted whenever there’s a change to config files, so make sure you do that:
sudo service nginx restart(IF IN DOUBT, RESTART NGINX. THAT IS YOUR NEW MOTTO.)
You can check if Nginx is running:
systemctl status nginxIf you have a website you want to try out already, copy the files over to the directory you made earlier:
sudo cp -r /path/to/your/site/* /var/www/mywebsiteDon’t have one? Don’t worry, Auntie Adie is here to help with this masterpiece. Save it as index.html to the folder /var/www/mywebsite. You can do so with nano if you hate life, with sudo nano /var/www/mywebsite/index.html:
<!doctype html>
<html lang="en">
  <head>
    <meta charset="UTF-8" />
    <title>cool website</title>
  </head>
  <body>
    <h1>Hello from Nginx. ^_^</h1>
  </body>
</html>
Make sure your HTML is correct because you don’t want to spend an hour trying to troubleshoot Nginx only to discover the issue with your site not appearing was because you didn’t close the meta tag properly! I would never do that, but you might.
Anyway, you can now view your website on the same computer as the host by popping localhost in your browser.
 Truly amazing. FAANG, here I come.
Baby steps. Time to make it slightly more interesting.
Serve a frontend and backend on your local network
The next mini-project assumes again that there will be an index.html file in /var/www/mywebsite
If you aren’t interested in running the backend and are happy enough just serving static files where they are already, skip to the updated server block config.
Add a new folder called app:
mkdir /var/www/mywebsite/app/A NodeJS app will live there. We’ll also serve an HTML and CSS file.
Change your index.html to this:
<!doctype html>
<html lang="en">
  <head>
    <meta charset="UTF-8" />
    <meta name="viewport" content="width=device-width, initial-scale=1.0" />
    <link rel="stylesheet" href="styles.css" />
    <title>My List</title>
  </head>
  <body>
    <p>Making Fetch Happen</p>
    <button onclick="makeRequest()">Make Request</button>

    <p id="result"></p>

    <script>
      function makeRequest() {
        fetch("http://0.0.0.0:8000") // replace 0.0.0.0 with your IP address
          .then(response => response.json())
          .then(data => {
            const listElement = document.getElementById("result");
            while (listElement.firstChild) {
              listElement.removeChild(listElement.firstChild);
            }
            data.forEach(item => {
              const listItem = document.createElement("li");
              listItem.textContent = item.trim();
              listElement.appendChild(listItem);
            });
          })
          .catch(error => {
            console.error("Error:", error);
          });
      }
    </script>
  </body>
</html>
Woahhhhhhh, what is THAT? Is that VANILLA JavaScript? Yes it is. Do not be scared.
Add a file: styles.css
Make your own styles if you want. Or just don’t bother including CSS at all if you are lazy. 🙃
body {
  font-family: Arial, sans-serif;
}

button {
  background-color: #4caf50;
  color: white;
  padding: 15px 32px;
  text-align: center;
  text-decoration: none;
  display: inline-block;
  font-size: 16px;
  margin: 4px 2px;
  cursor: pointer;
}

ul {
  list-style-type: none;
  padding: 0;
}

li {
  padding: 8px;
  margin-bottom: 7px;
  background-color: #eee;
  color: #333;
}
Move into the app folder:
cd /var/www/mywebsite/app/If you don’t have Node installed already, follow these steps:
sudo apt update
sudo apt install nodejs
Check if the installation was successful by obtaining the Node version number:
node -vNow, install its package manager, NPM:
sudo apt install npmInitialize a new Node project with:
npm init -yInstall all the required packages:
npm install express cors nodemonCreate a file named server.js and place the following code in it:
const express = require("express");
const cors = require("cors");
const app = express();
const port = 8000;

const corsOptions = {
  origin: "http://0.0.0.0", // replace 0.0.0.0 with your IP address
  optionsSuccessStatus: 200,
};

app.use(cors(corsOptions));

app.get("/", (req, res) => {
  const shoppingList = [
    "Milk",
    "Bread",
    "Cheese",
    "Vegetables",
    "Fruits",
    "Cereal",
  ];
  res.send(shoppingList);
});

app.listen(port, () => {
  console.log(`Server is running on port ${port}`);
});
Open the package.json file created during project initialization and add the following script:
"scripts": {
    "start": "nodemon server.js"
}
The updated package.json file should look like this (along with a bunch of other stuff it added on initialize):
{
  "dependencies": {
    "cors": "^2.8.5",
    "express": "^4.18.2",
    "nodemon": "^3.0.3"
  },
  "scripts": {
    "start": "nodemon server.js"
  }
}
In short, Express allows us to create an API, CORS restricts requests to the backend to only be allowed from your IP, and Nodemon serves the API while automatically restarting the backend server upon code changes. That’s about as much detail as I’ll go into here because this is meant to be an Nginx tutorial and not a Node tutorial.
Start the backend with the created script:
npm startThe app is served from your local IP address, which you can obtain with:
hostname -ICopy and insert this IP into the code where it says [your local IP].
Update the Nginx configuration by editing the file:
sudo nano /etc/nginx/sites-available/myconfigReplace the previous configuration with this:
server {
    listen [your local IP]:80;
    server_name _;

    root /var/www/mywebsite;
    index index.html;

    location / {
        try_files $uri $uri/ /index.html;
    }

    location /app/ {
        proxy_pass http://localhost:8000/;
        proxy_http_version 1.1;
        proxy_set_header Upgrade $http_upgrade;
        proxy_set_header Connection 'upgrade';
        proxy_set_header Host $host;
        proxy_cache_bypass $http_upgrade;
    }
}
Ensure the trailing slashes (/) after “app” and “localhost” are included.
Restart the Nginx process:
sudo systemctl restart nginxWhat exactly is going on in this slightly new and improved server block? It’s not too different to the first one we tried.
listenSpecifies the IP address and port to listen on.server_nameThe _ as the server name means that this server block will respond to requests regardless of the host name provided in the request.rootSets the root directory for this server block. All file paths mentioned in this block will be relative to this root directory.indexSpecifies the default file to serve when a directory is requested. In this case, it’s index.html.locationHandles requests to the root URL (/). It uses the try_files directive to attempt to serve existing files or directories; if not found, it serves /index.html.location /app/Handles requests to URLs starting with /app/. It is a reverse proxy configuration (proxy_pass) that forwards requests to a backend server athttp://localhost:8000/. This is useful for handling dynamic content or forwarding requests to another server.
To troubleshoot, check the syntax:
sudo nginx -tView the app by entering your local IP in the browser. Press the ‘Make Request’ button, and if all goes well, your shopping list will be fetched from the backend and displayed on the frontend.
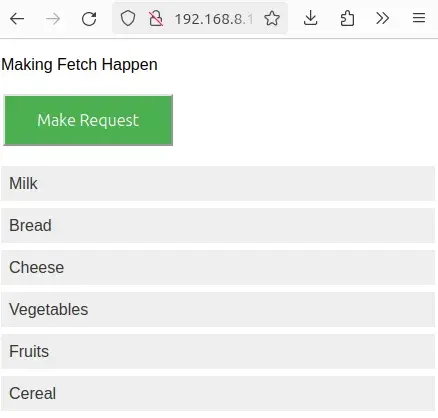 The desired result.
In part 2, we’ll cover getting a domain name to point to it and other important steps.
Source code: GitHub