Ollama is an open-source app that lets you get up and running with Large Language Models (LLM) on your computer. You can run and interact directly with a model in a terminal or you can use the app’s REST API in your own apps.
I’m going to cover why Ollama exists, why you’d want to use it, and, most importantly, how to use it.
What Problem Does Ollama Solve?
Ollama isn’t the first of its kind. There’s already an open-source library called Llama.cpp which, as you may be able to tell from the name, is built on C/C++. Llama.cpp already enables enthusiasts and researchers to have fast inferences of LLMs on personal machines.
Ollama acts as a wrapper to Llama.cpp, making it more accessible and abstracting away lower-level details.
It has some neat features like model management, allowing you to easily download and switch between different LLM models. It supports multimodal inputs like images and audio. And it handles automatic prompt formatting for the different models you may end up using.
Arguably one of the best things of all is that Ollama has compatibility with the OpenAI Chat Completions API, making it a great drop-in replacement for apps that were already set up with OpenAI API integration.
Prerequisites
Being able to run these models and code assumes:
- Some basic knowledge of using terminal commands.
- A computer capable of running a model (or you know your way around cloud computing to borrow someone else’s machine).
- Some basic Python knowledge. But honestly you can probably just cut ‘n’ paste everything and be done with it.
- CUDA Toolkit installed if you’re using GPU processing.
Technical Requirements for Ollama
You could run Ollama on a potato PC but the real issue is when you get into the model sizes. The Ollama library has many tantalising models available and while that 70B parameter Llama3 model might be the one you desire, unless you have graphics cards running a minimum total of 140 GB memory you’re going to be in for a pretty bad time. In short, it will be slow as heck (if it doesn’t outright crash your system).
But don’t fear. According to Ollama’s documentation, you should have at least
- 8 GB of RAM available to run the 7B models
- 16 GB to run the 13B models
- 32 GB to run the 33B models
All the vision models used in this little project have 8B versions and below. The currently popular Nvidia GTX 3060 graphics card has 12GB of memory so it will be more than perfectly capable.
The aforementioned Llama3 also offers a 7B model that will take up less than 5 GB of space on your drive.
You also don’t necessarily need a fancy Nvidia or AMD graphics card to run some of them…. although inference will be slower. In the name of science, I tried running one of the tiny models on a Raspberry Pi 5. It took, er, four minutes to generate a paragraph but it got there in the end!
The advice I’ve seen is that you’re generally looking at 2 GB of GPU VRAM memory for every 1-billion parameters. The older Llama-2-70b, for example, requires around 140 GB of VRAM. The current top-end consumer graphics card, the Nvidia RTX 4090, has 24 GB. As you can see, even taking into the combined power of that and a ‘typical’ CPU, we’re falling a little short here.
Some integrated cards on laptops should be enough to run some smaller models.
Hopefully, you have enough beef. If so, let’s get started.
Install and Run Ollama
Ollama is available for Linux, Mac, PC, and as a Docker image. On Linux, all you need to do is pop this into your terminal:
curl -fsSL https://ollama.com/install.sh | sh
For the others, download them here.
Test out your new toy by running one of the small models, Microsoft’s 3.8B model, Phi-3:
ollama run phi3
If you don’t already have the model downloaded it, this command will do it for you and run it. If you just want to download models and not run them straight away, use the pull command instead:
ollama pull phi3
Type in whatever you want to test it out and type /bye or press CTRL + d to quit.
For the list of available models, check Ollama’s website. Click through to each model’s page and check the pull-down menus on each to see the list of model variants.
You can remove a model with the rm command, eg ollama rm llama3
List all the models you’ve downloaded with ollama list
For more commands, just type ollama to see them.
How to Use the Ollama REST API
You can test making an API request by using a curl command, changing the model to whatever you’ve downloaded and the prompt to something sensible (or not), although the response you get isn’t going to be awfully readable:
curl http://localhost:11434/api/generate -d '{
  "model": "phi3",
  "prompt":"What has humanity decided regarding the state of pineapple on pizza?"
}'
Let’s make something a little more interesting.
This first app will:
- List the models you have available.
- Prompt you for some input.
- Generate a response.
- Exit. That’s your lot.
Time for some Python.
-
Install the Ollama Python library with
pip install ollama -
Make sure Ollama is running by typing
ollama serveinto a terminal -
Run this code:
import ollama

def get_available_models():
    available_models = ollama.list()
    model_names = [model["name"] for model in available_models["models"]]
    return model_names

def select_model(model_names):
    if model_names:
        print("Available models:\n")
        for i, model_name in enumerate(model_names):
            print(f"{i+1}. {model_name}")
        while True:
            try:
                model_number = (
                    int(input("\nEnter the number of the model you want to use: ")) - 1
                )
                if model_number < 0 or model_number >= len(model_names):
                    raise ValueError
                break
            except ValueError:
                print("Invalid input. Please enter a valid number.")

        return model_names[model_number]
    else:
        return None

def get_response(selected_model):
    response = ollama.chat(
        model=selected_model,
        messages=[
            {
                "role": "user",
                "content": input("What would you like to know?: "),
            },
        ],
    )
    return response["message"]["content"]

model_names = get_available_models()
selected_model = select_model(model_names)
response = get_response(selected_model)

print(f"Response from {selected_model}:\n", response)
By default, Ollama will keep a model in memory for five minutes, so the first time you choose one it will take a few seconds (depending on your tech specs) to load.
Congratulations - you’ve successfully made an API call to Ollama and got a response.
You can currently find the Ollama REST API documentation on their GitHub repo.
That was a very boring code example so let’s do something better.
Make an Image Recognition App With Text-to-Speech
This web app will:
- Create a web app with Streamlit.
- Process an image into a format readable by the LLM.
- Send a request to the Ollama API endpoint and get a response.
- Display the response.
- Use text-to-speech to read the response.
Thankfully, good old Python has packages available to aid us. Streamlit makes it super easy to prototype a web app to test your masterpiece so you don’t even need to touch HTML and its gang.
Time to cook.
1) Install all the necessary third-party packages with pip install ollama streamlit pillow pyttsx3. You can leave out pyttsx3 if you don’t care about text-to-speech, but if you’re using it and you’re also on Linux, you’ll also need a few more installs: sudo apt update && sudo apt install espeak ffmpeg libespeak1
2) Pull a vision-capable model. At the time of writing, there were three which I tried.
llava comes in three main flavours: 7b (default), 13b and 34b.
Pull the most basic of them with ollama pull llava
Or pull the 13B model with ollama pull llava:13b or the 34B model with ollama pull llava:34b
If you don’t have much compute power, you can try a 3.8B model, llava-phi3: ollama pull llava-phi3
Finally there’s another 8B model llava-llama3: ollama pull llava-llama3
3) Start writing some code. Import the packages:
import io
import base64
import streamlit as st
import ollama
from PIL import Image
import pyttsx3
4) The next step it to list the available models.
How you do it is up to you. If you’ve only downloaded the vision models listed in step 2, you can use a function similar to the one in the previous code example which lists all the available models on your system. If you’re like me and you’ve been playing with lots of other models, you may wish to manually set which models the app can show to the user. That’s how I did it. Add a new line, entering the names of the models you want available:
available_models = ["llava", "llava-llama3", "llava-phi3"]5) Write a function to convert the image to Base64. This will turn the image file into a string the model can decipher:
def image_to_base64(image_file):
    image_data = image_file.read()
    encoded_string = base64.b64encode(image_data).decode("utf-8")
    return encoded_string
6) Convert images to JPG. Some of my PNG files were giving me errors, so I made a function to convert PNG to RGB format and then convert it to a JPG. It also works with the newer WEBP format. There’s also a function to check if the file is already a JPG, in which case it doesn’t need converting. Flagging the image quality as ‘100’ stops any file compression happening.
def convert_to_rgb(image):
    if image.mode in ("RGBA", "P"):
        return image.convert("RGB")
    return image

def convert_to_jpeg(image, quality=100):
    byte_arr = io.BytesIO()
    image.save(byte_arr, format="JPEG", quality=quality)
    return byte_arr.getvalue()

def is_jpeg(file):
    return file.type.lower() in ["jpg", "jpeg"]
7) Process the image. The next function pulls everything together to get the image nice and ready to be fed to the model.
def process_image(uploaded_file):
    uploaded_file.seek(0)
    image = Image.open(uploaded_file)

    if not is_jpeg(uploaded_file):
        image = convert_to_rgb(image)
        encoded_image = base64.b64encode(convert_to_jpeg(image)).decode("utf-8")
    else:
        encoded_image = base64.b64encode(uploaded_file.read()).decode("utf-8")

    return image, encoded_image
8) Make a function to call the API. This will get a response from the model, which will stream in the response. If you don’t like the streaming effect and would rather have all the text appear at once when it’s ready, I’ll let you investigate the docs yourself to figure out how to do that.
def get_streaming_response(encoded_image_string, model):
    try:
        stream = ollama.chat(
            model=model,
            messages=[
                {
                    "role": "user",
                    "content": "describe this image",
                    "images": [encoded_image_string],
                }
            ],
            stream=True,
        )

        for chunk in stream:
            yield chunk["message"]["content"]
    except Exception as e:
        st.error(f"Error occurred: {str(e)}")
Note that “describe this image” could be anything! Maybe you want to make a game of it and feed it stills from movies to see if it can tell “what movie is this from?” (which will undoubtedly create some humorous responses). Experiment and see what you can come up with!
9) Add text-to-speech. You don’t have to do this if you’d rather have a silent protagonist but OpenAI brought out GPT-4o as I was putting this guide together and I didn’t want to be outdone. Haha, I win.
def text_to_speech(text):
    engine = pyttsx3.init()
    engine.say(text)
    engine.runAndWait()
Wow, that was easy.
10) Add a button to generate the response. This is where you’ll use Streamlit (imported as ‘st’) to make a button the user clicks on to generate a response. You can click it to re-generate a different response, either using the same model or after selecting a different one (just remember each time you switch models it needs a little time to load into memory). You can adjust the ‘height’ parameter to make the output text area bigger or smaller to your liking. If you didn’t add the text-to-speech function, you can leave out the last line to enjoy peaceful responses.
def generate_response(encoded_image_string, model):
    response = get_streaming_response(encoded_image_string, model)
    output_text = ""
    output_slot = st.empty()
    for i, r in enumerate(response):
        output_text += r
        output_slot.text_area(
            "Output", output_text.strip(), height=400, key=f"output_{i}"
        )
    text_to_speech(output_text)
11) Render the UI. Make a function to render the UI to keep our nice, functional code all nice and functional-looking. And finally, call the function to render it.
def render_ui():
    st.title("Image Description Generator")

    uploaded_file = st.file_uploader(
        "Choose an image...", type=["jpg", "jpeg", "png", "webp"]
    )
    model = st.selectbox("Choose a model:", available_models)

    if uploaded_file is not None and model:
        image, encoded_image = process_image(uploaded_file)
        st.image(image, caption="Uploaded Image", use_column_width=True)

        new_response = st.button("Generate Response")
        if new_response:
            generate_response(encoded_image, model)

render_ui()
12) Save the code. Run the app. Serve Streamlit apps by typing:
streamlit run your_file_name.py
Visit the app in your browser which by default will be at http://localhost:8501/
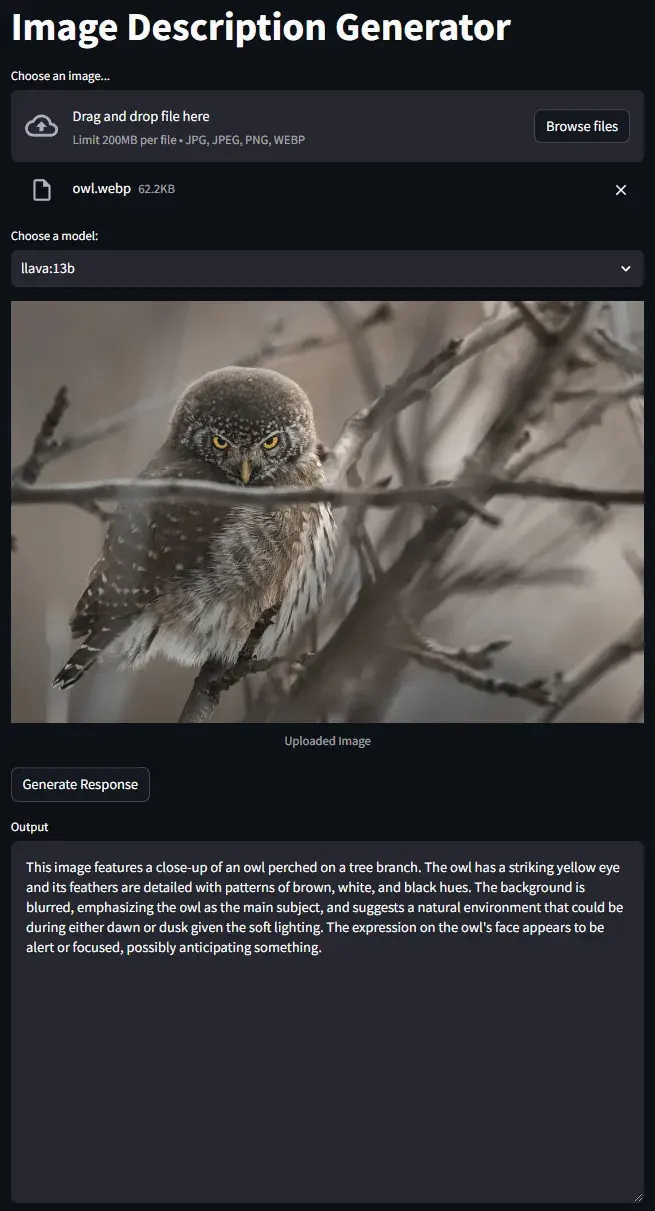
13) Test the app. Drag or click to upload an image file from your computer, select a model, and generate some text!
If you just want to cut ‘n’ paste the whole lot, this is what the final code should look like:
import io
import base64
import streamlit as st
import ollama
from PIL import Image
import pyttsx3

# Adjust model names as necessary.
available_models = ["llava", "llava-llama3", "llava-phi3"]

def image_to_base64(image_file):
    image_data = image_file.read()
    encoded_string = base64.b64encode(image_data).decode("utf-8")
    return encoded_string

def convert_to_rgb(image):
    if image.mode in ("RGBA", "P"):
        return image.convert("RGB")
    return image

def convert_to_jpeg(image, quality=100):
    byte_arr = io.BytesIO()
    image.save(byte_arr, format="JPEG", quality=quality)
    return byte_arr.getvalue()

def is_jpeg(file):
    return file.type.lower() in ["jpg", "jpeg"]

def process_image(uploaded_file):
    uploaded_file.seek(0)
    image = Image.open(uploaded_file)

    if not is_jpeg(uploaded_file):
        image = convert_to_rgb(image)
        encoded_image = base64.b64encode(convert_to_jpeg(image)).decode("utf-8")
    else:
        encoded_image = base64.b64encode(uploaded_file.read()).decode("utf-8")

    return image, encoded_image

def get_streaming_response(encoded_image_string, model):
    try:
        stream = ollama.chat(
            model=model,
            messages=[
                {
                    "role": "user",
                    "content": "describe this image",
                    "images": [encoded_image_string],
                }
            ],
            stream=True,
        )

        for chunk in stream:
            yield chunk["message"]["content"]
    except Exception as e:
        st.error(f"Error occurred: {str(e)}")

def text_to_speech(text):
    engine = pyttsx3.init()
    engine.say(text)
    engine.runAndWait()

def generate_response(encoded_image_string, model):
    response = get_streaming_response(encoded_image_string, model)
    output_text = ""
    output_slot = st.empty()
    for i, r in enumerate(response):
        output_text += r
        output_slot.text_area(
            "Output", output_text.strip(), height=400, key=f"output_{i}"
        )
    text_to_speech(output_text)  # Omit this line for peace and quiet

def render_ui():
    st.title("Image Description Generator")

    uploaded_file = st.file_uploader(
        "Choose an image...", type=["jpg", "jpeg", "png", "webp"]
    )
    model = st.selectbox("Choose a model:", available_models)

    if uploaded_file is not None and model:
        image, encoded_image = process_image(uploaded_file)
        st.image(image, caption="Uploaded Image", use_column_width=True)

        new_response = st.button("Generate Response")
        if new_response:
            generate_response(encoded_image, model)

render_ui()
Again, make sure you have the necessary packages installed: pip install ollama streamlit pillow pyttsx3
… and that you have Ollama running with ollama serve
Conclusion
I’ve covered why Ollama is used, what you need to get things running, how to make a basic API call to its REST API, and how to combine a few different ideas to prototype a web app you can hopefully have some fun with. Go forth and experiment some more to your heart’s content.
Sources and handy links:
https://github.com/ollama/ollama
https://github.com/ollama/ollama/blob/main/docs/api.md - API reference
https://github.com/ollama/ollama/blob/main/docs/faq.md - FAQ. Very handy
https://github.com/nateshmbhat/pyttsx3 - Text-to-speech module
https://docs.streamlit.io/ - Streamlit docs